Durham Region Light Pollution and where to find a Dark Sky Site

Light pollution map of Durham Region.

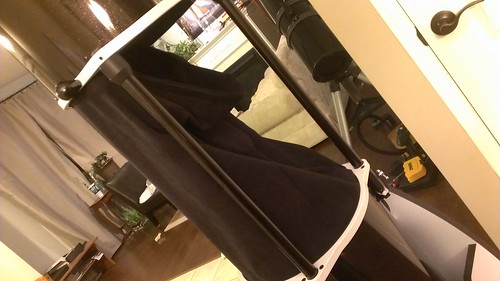
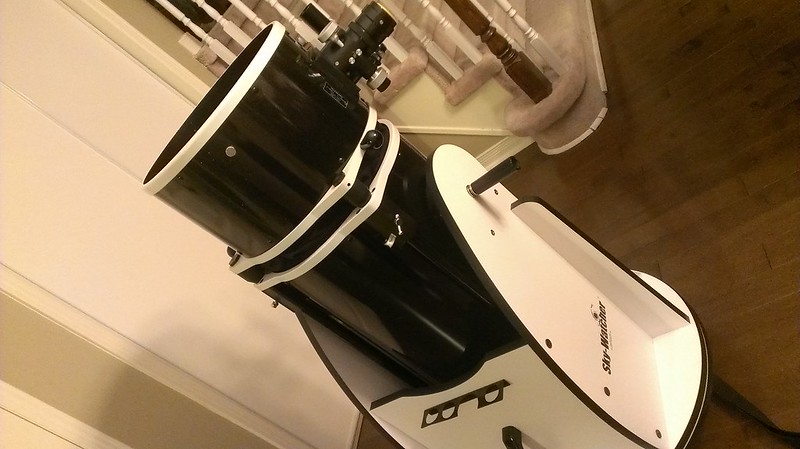
When I first started observing with my telescopes, I had an idea what light pollution meant, but did not realize its impact on visual observation especially on Deep Sky Objects (DSO’s). I thought I could observe anywhere I wanted  as long as it was a cloudless sky. I live in the Durham Region after all. Not so fast.

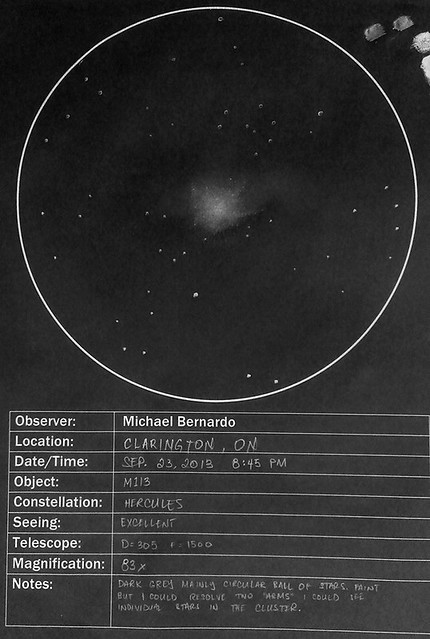
I spent an entire week hunting for the M13 and the Andromeda Galaxy to no avail. Why? Because my sky was brighter than these faint objects. I eliminated most of the local light pollution from my backyard by turning my kitchen lights off, my cell phone, light shields for my telescopes, and used a blanket over my head to block out my neighbour’s lights. After 15 mins of dark adaptation, I still see nothing of these objects.

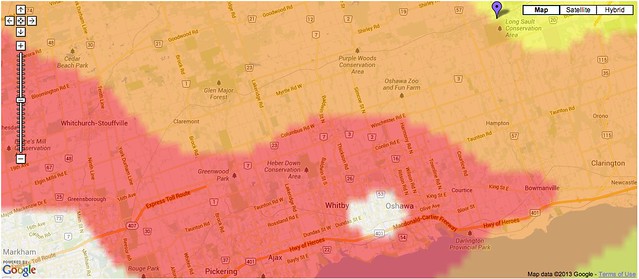
It turns out that there is a ‘light dome’ high above my sky. The light pollution map above represents the intensity of this light dome super imposed over a map of Durham Region and eastern Greater Toronto Area (GTA). In the order of brightness level:

  • White – Entire sky is grayish or brighter.
  • Red – Milkyway at best very faint at zenith.
  • Orange – Milkyway washed out at zenith and invisible at horizon.
  • Green – Some dark lanes in milkyway but no bulge into Ophiuchus.
  • Yellow – Zodiacal light seen on best nights.
  • Blue – Low light domes on horizon.
  • Grey – Faint shadows cast by milkyway visible on white objects.
  • Black – Gegenschein visible. Zodiacal light annoyingly bright.

I live a suburb of Oshawa in a red zone and within a few minutes of a white zone in the core of the city. By driving to an orange zone 20 minutes away, I was able to see some of the Milky Way’s ‘spilled milk’ look across the sky whereas it was not at all visible from my backyard. I finally found M13 and it didn’t take long for it to ‘pop’ out of my eyepiece. If you want to know the light pollution map in your area, check out Dark Sky Finder by Jonathan Tomshine: http://www.jshine.net/astronomy/dark_sky/ and you will find some dark sky sites around the GTA area within an hour’s drive.

In the Durham Region, I do most of my DSO observations from Long Sault Conservation Area which is just outside the grasp of the red zone. Sometimes I use my local club’s DRAACO observatory which is well within the orange zone. It is well worth the drive for a great night of visual observation and sketching.

Please do not axe the Sky at Night: Did you sign the Petition?

A petition started by Karen Barker went viral in the past 3 days. It was a petition stop the BBC from discontinuing the popular astronomy show ‘Sky at Night’.

The Petition: We started as a group of Open University students, who were made aware that the BBC was planning to cancel The Sky At Night.  This is something to which we strongly object.  Since starting the campaign to save S@N, the BBC has stated that it is still in discussions about the future of the programme.

As of Sep. 26, 2013 at 2:10 PM EDT, there were over 27,000 signatures. Mine is one of them.

Click Here To Sign It Too

Messier 33: Triangulum Galaxy

The evening started out mostly clear at around 7 PM. By the time I reached the DRAACO observation site, wispy clouds have taken over almost half of the sky. Visibility was on and off from clear, hazy, to cloudy. I used the September SkyMaps again but my intended targets were covered by clouds so I found these alternate targets instead. Sky conditions continued to deteriorate throughout the night. My finder scope did not dew up, thanks to my new dew shield.

Object #9: M33
Location: DRAACO, Orono, ON
Date/Time: Sep. 26, 2013 9:40 PM
Constellation: Andromeda
Seeing: Poor with 50% cloud cover
Telescope: D=305 mm F=1500 mm
Magnification: 62 x @ 82° AFOV
Notes: Difficult to resolve the structure. Star field was rich. It was a dark grey dim blob.

Messier 33: Triangulum Galaxy

On September 17, 2013, I officially started the pursuit of my Messier 30 certificate. It is an exciting awards program for astronomy club members and a way for amateur astronomers to keep track of their observations. The Messier 30 is the first milestone in AstronomyForum.net‘s certificate program. The Durham Region Astronomy Association also has one.

View Updated Spreadsheet

Messier 51: Whirlpool Galaxy

The evening started out mostly clear at around 7 PM. By the time I reached the DRAACO observation site, wispy clouds have taken over almost half of the sky. Visibility was on and off from clear, hazy, to cloudy. I used the September SkyMaps again but my intended targets were covered by clouds so I found these alternate targets instead. Sky conditions continued to deteriorate throughout the night. My finder scope did not dew up, thanks to my new dew shield.

Object #8: M51
Location: DRAACO, Orono, ON
Date/Time: Sep. 26, 2013 9:00 PM
Constellation: Ursa Major
Seeing: Poor with 50% cloud cover
Telescope: D=305 mm F=1500 mm
Magnification: 83.3 x @ 82° AFOV
Notes: Two distinct objects both faint and dark grey with brighter cores. One is larger. They appear to be connected.

Messier 51: Whirlpool Galaxy

On September 17, 2013, I officially started the pursuit of my Messier 30 certificate. It is an exciting awards program for astronomy club members and a way for amateur astronomers to keep track of their observations. The Messier 30 is the first milestone in AstronomyForum.net‘s certificate program. The Durham Region Astronomy Association also has one.

View Updated Spreadsheet

Messier 81: Bodes Galaxy & Messier 82: Cigar Galaxy

When I arrived at Long Sault Conservation Area, there were parts of the sky where it was very clear. The eastern part of the Milky Way was easily viewable but from zenith westward, it was washed out with clouds and light pollution. I printed off “The Evening Sky Map” ahead of time and planned on taking M2, M39, and M92 by highlighting them with pink highlighter before driving. But I could not tell which ones I highlighted through the red flashlight! Also, I installed my new dew shield on my finder scope but I threw it out of alignment. I was too lazy to line it up and instead picked M81 and M82 from the Sky Map by rough aligning and panning… and I found it within 2 minutes without the finder scope! I was at awe to see 2 distant galaxies in 1 eyepiece! They appeared very similar length wise, but one is flatter. By the time I finished with the sketch, the clouds have taken over 30% of the sky. I was so satisfied with tonight’s short but sweet session, so I packed it in.

Objects #6, #7: M81, M82
Location: Clarington, ON
Date/Time: Sep. 25, 2013 10:00 PM
Constellation: Ursa Major
Seeing: Below average with cloud patches
Telescope: D=305 mm F=1500 mm
Magnification: 62 x @ 82° AFOV
Notes: Two patches of very dim smudges. One looks like a galaxy that is flat and edge on. The other more oval. Found it difficult to reach focus. Very low in the horizon.

Messier 81: Bodes Galaxy & Messier 82: Cigar Galaxy

On September 17, 2013, I officially started the pursuit of my Messier 30 certificate. It is an exciting awards program for astronomy club members and a way for amateur astronomers to keep track of their observations. The Messier 30 is the first milestone in AstronomyForum.net‘s certificate program. The Durham Region Astronomy Association also has one.

View Updated Spreadsheet

Messier 31, 32, 110: Andromeda Galaxy and Companion Galaxies

Objects #3, #4, #5: M31, M32, M110
Location: Clarington, ON
Date/Time: Sep. 23, 2013 9:35 PM
Constellation: Andromeda
Seeing: Above average with gibbous moon starting to rise
Telescope: D=305 mm F=1500 mm
Magnification: 62 x @ 82° AFOV
Notes: I should have sketched this before M13. Seeing above average but waning gibbous moon had started to rise while obseving these. M31 was a faint dark grey smudge. Dark lanes were not noticeable. M31 appeared close by looking like a faint star. M110 was a small faint smudge visible with averted vision.

Messier 31, 32, 110: Andromeda Galaxy and Companion Galaxies

On September 17, 2013, I officially started the pursuit of my Messier 30 certificate. It is an exciting awards program for astronomy club members and a way for amateur astronomers to keep track of their observations. The Messier 30 is the first milestone in AstronomyForum.net‘s certificate program. The Durham Region Astronomy Association also has one.

View Updated Spreadsheet


Messier 13: Great Globular Cluster in Hercules

It was an excellent night until the moon rose but I was able to observe 4 objects tonight.

Object #2: M13
Location: Clarington, ON
Date/Time: Sep. 23, 2013 8:45 PM
Constellation: Hercules
Seeing: Excellent
Telescope: D=305 mm F=1500 mm
Magnification: 83 x @ 82° AFOV
Notes: Dark grey mainly circular ball of stars. Faint but I could resolve two “arms”. I could see individual stars in the cluster.

Messier 13: Great Globular Cluster in Hercules

On September 17, 2013, I officially started the pursuit of my Messier 30 certificate. It is an exciting awards program for astronomy club members and a way for amateur astronomers to keep track of their observations. The Messier 30 is the first milestone in AstronomyForum.net‘s certificate program. The Durham Region Astronomy Association also has one.

View Updated Spreadsheet


Messier 45: The Pleiades

Object #1: M45
Location: Oshawa, ON
Date/Time: Sep. 18, 2013 11:45 PM
Constellation: Taurus
Seeing: Below average with a full moon
Telescope: D=305 mm F=1500 mm
Magnification: 24 mm @ 82° AFOV
Notes: Bright white group of stars with a hint of baby blue. Background was too washed out to resolve any wisps. Too big to fit in FOV.

Messier 45: The Pleiades

On September 17, 2013, I officially started the pursuit of my Messier 30 certificate. It is an exciting awards program for astronomy club members and a way for amateur astronomers to keep track of their observations. The Messier 30 is the first milestone in AstronomyForum.net‘s certificate program. The Durham Region Astronomy Association also has one.

View Updated Spreadsheet


First Light with 12″ Sky-Watcher Flextube

My used 12″ Sky-Watcher Flextube pointed at the moon.

I took my 12″ Sky-Watcher Flextube to the Durham Region Astronomical Association’s dark site last night for the first time and found that the location was a few minutes further and more difficult to get to than Long Sault Conservation.

Moon: With a 75% full moon, it lit up the haze so much that I could not even resolve M31. So I put my shades on and observed the moon instead. The details of the moon’s surface at the terminator was spectacular. With a barlowed 7mm (428x), the image was wavering quite a bit, but so incredible. I could resolve the craters and the shadows they cast. It was like hovering over the moon in a spaceship.

Jupiter: I packed up and went to friend’s house to watch a boxing match. By the time it was over, it was already 2 AM and I could see Jupiter already. So I setup my telescope right at my front steps to observe it. At 214x, I could resolve the 2 dark stripes and at least 4 moons but again, it was wavering and not focused. At 428x, it was even worse. I was a little disappointed because the view was only marginally better than my Discovery 8 EQ.

M42 Orion Nebula: By 3 AM, I noticed Orion’s belt was higher and was above a line of haze. Still struggling with my right-angle viewfinder orientation, I pointed it in the general direction of M42 and started panning the area at 62x. It took 30 minutes and I was about ready to give up, until I noticed a glare from the corner of the FOV. I followed the glare as it got more intense, and then it emerged: The Orion Nebula.

I couldn’t believe it that even with all that haze, it was resolving with very good contrast. I noticed at least 2 round voids occupied by stars in the white dust that radiated away from the centre in 180 degree direction. I was so happy that I even woke up my wife to show it to her. Her reaction after seeing it was interesting to me: “you mean that cloud?”

My 12″ Sky-Watcher Flextube at the DRAACO observatory.

Concerns: Significantly heavier and more awkward to transport than the Discovery 8 EQ. Altitude adjustment was sticky and tube is bottom-heavy it wants to slew up quite often by itself. No significant proof of improvement over the Discovery 8 EQ thus far.

At 4 AM I packed it in. What a great ending for a mostly disappointing night.

DIY Custom Shroud for 12″ Sky-Watcher Flextube

Custom-made light shroud for my 12″ Sky-Watcher Dobsonian telescope.

Rainy days and cloudy nights make me so restless. Tonight was another one of those nights. All day, I had been thinking about custom cutting a foam sleeping mat as a shroud for my Sky-Watcher 12″ Dobsonian Flextube. But on the way home, I came up with something a little more complicated and time-consuming. A custom-made cloth shroud.

Measuring the shroud material twice and cutting once.

Step 1: I measured the inside diameter of the top and bottom tubes and the distance between them. I came up with 42.5″ diameter x 23″ height. I went to the local Fabricland and bought a thick black cloth from the clearance section ($7).

Christi sewing the edges of the shroud.

Step 2: I measured again and noticed that I had to reduce the inside diameter by half an inch to account for the thickness of the cloth. The maximum thickness allowance is 0.5″, otherwise, the material will reduce the aperture. I folded and ironed the new measurements. My wife sewed the edges for me.

Pins helped hold the folds in place while I sewed by hand.

Step 3: I taped 2 and a half lengths of velcro ($3 from Dollarama) to the top and bottom edges of the cloth and ironed them on. But by that time, my wife had gone to bed. So I had to sew the width side by hand to form the tube (the sewing machine was too complex for me).

Shroud velcro’ed to the primary tube.

Step 4: I then taped the hook side of the velcro to the inside of the top and bottom tubes and attached the shroud starting from the bottom.

Shroud partially attached to the secondary tube.

Step 5: With a little tug, I attached the top making sure it was taught all the way around. I looked through the focuser to ensure the shroud was not in the way of the primary.

Voila! A custom-made shroud just the way I like it. Tomorrow, I will be sewing the velcro onto the shroud because it is peeling off.

Hope you enjoyed this DIY.

Light shroud shown with the telescope fully extended.
Light shroud folds neatly in the tube when the telescope is collapsed.