
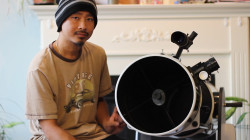
In this video, I demonstrate how I collimate my newtonian telescope without a cheshire (if you don’t have one). There are 3 basic steps to collimating: 1) Center the secondary under the focuser; 2) Align the secondary to the primary; 3) Align the primary back to the secondary. In step one, I will use a camera phone instead of a cheshire to center the secondary under the focuser tube. Click on the video below to play.
Category Archives: Gear
Telescopes, binoculars, cameras, accessories, etc.
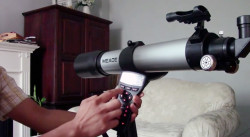
Meade 90mm StarNavigator Refractor DS2090AT-TC
This is my first ever astronomy gear review of my first telescope: the Meade 90mm StarNavigator Refractor (DS2090AT-TC). It has a 90mm aperture objective, 800mm focal length giving it a focal ratio of F/8.8. It is computer-guided which is perfect for beginners.
Overall
I think this is a great telescope for a beginner such as myself. It got me hooked into astronomy that now I want to learn more about it.
Dislikes
The mount could be very flimsy. When you’re adjusting for focus, it takes about 5 to 10 seconds for the vibrations to stop. Sometimes the GOTO capability isn’t quite accurate. The focuser is made of plastic that it might not be able to handle the weight of heavier accessories.
Likes
I like its simple design and build quality. I like how light it is to transport and how the tray does not need to be disassembled to fold the legs. I like the GOTO capability when it works. It allows a beginner like myself to spend more time observing than looking for objects.
Astronomy Observation Session Checklist and Tips
I live in a white/red zone so my skies only show the major stars of the constellations, so I have to drive to a dark sky site whenever I want to observe DSO’s. It seems every time I drive out to a dark sky site for astronomy sketching and observation, I always end up forgetting to bring something. Last night, I forgot to bring my observer’s chair. The night before that, it was my blending stump. So I came up with a checklist for me to go over before each trip.
I only bring 1 telescope at a time so I will only check off items under the ‘Dob’ or ‘Newt’ categories.
| Category | Item | |
| Dob | OTA caps | |
| Dob | Mount | |
| Dob | Altitude Handles | |
| Dob | Focuser adapters/caps | |
| Newt | OTA cap | |
| Newt | Mount | |
| Newt | Suppression pucks | |
| Newt | Focuser cap | |
| Accessories | Eyepieces & caps | |
| Accessories | Flashlights | |
| Accessories | Observer’s chair | |
| Tools | Sky Atlas | |
| Tools | Laser Collimator | |
| Tools | Allen key & screwdriver | |
| Sketching | Clipboard | |
| Sketching | Pencils | |
| Sketching | Blending stump | |
| Sketching | Sketch templates | |
| Sketching | Reading light | |
| Attire | Eyeglasses | |
| Attire | Jacket & Hat | |
| Attire | Gloves | |
| Optional | Laptop | |
| Optional | Binoculars | |
| Optional | Camera | |
| Mandatory | Coffee |
At the end of the observing session, I use the checklist again to make sure I did not forget anything. If I am alone at the site, I also drive over and light up the spot to check for any garbage I might have left behind.
Common Sense Tips
They may not applicable to you, but these obvious ones are my pre-requisites:
- Make sure the weather forecast is favourable.
- Ensure my car has enough gas for a round trip.
- Fully charge my mobile phone’s battery.
- Tell someone where I’m going and when I will be back.
Are you an amateur astronomer who has to drive to a dark site to observe like me? Care to tell us what you have on your checklist, if you have one?
First Light with 12″ Sky-Watcher Flextube

I took my 12″ Sky-Watcher Flextube to the Durham Region Astronomical Association’s dark site last night for the first time and found that the location was a few minutes further and more difficult to get to than Long Sault Conservation.
Moon: With a 75% full moon, it lit up the haze so much that I could not even resolve M31. So I put my shades on and observed the moon instead. The details of the moon’s surface at the terminator was spectacular. With a barlowed 7mm (428x), the image was wavering quite a bit, but so incredible. I could resolve the craters and the shadows they cast. It was like hovering over the moon in a spaceship.
Jupiter: I packed up and went to friend’s house to watch a boxing match. By the time it was over, it was already 2 AM and I could see Jupiter already. So I setup my telescope right at my front steps to observe it. At 214x, I could resolve the 2 dark stripes and at least 4 moons but again, it was wavering and not focused. At 428x, it was even worse. I was a little disappointed because the view was only marginally better than my Discovery 8 EQ.
M42 Orion Nebula: By 3 AM, I noticed Orion’s belt was higher and was above a line of haze. Still struggling with my right-angle viewfinder orientation, I pointed it in the general direction of M42 and started panning the area at 62x. It took 30 minutes and I was about ready to give up, until I noticed a glare from the corner of the FOV. I followed the glare as it got more intense, and then it emerged: The Orion Nebula.
I couldn’t believe it that even with all that haze, it was resolving with very good contrast. I noticed at least 2 round voids occupied by stars in the white dust that radiated away from the centre in 180 degree direction. I was so happy that I even woke up my wife to show it to her. Her reaction after seeing it was interesting to me: “you mean that cloud?”

Concerns: Significantly heavier and more awkward to transport than the Discovery 8 EQ. Altitude adjustment was sticky and tube is bottom-heavy it wants to slew up quite often by itself. No significant proof of improvement over the Discovery 8 EQ thus far.
At 4 AM I packed it in. What a great ending for a mostly disappointing night.
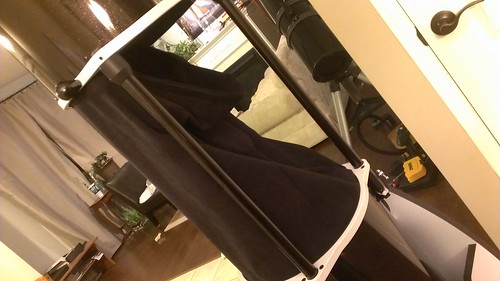
DIY Custom Shroud for 12″ Sky-Watcher Flextube
Rainy days and cloudy nights make me so restless. Tonight was another one of those nights. All day, I had been thinking about custom cutting a foam sleeping mat as a shroud for my Sky-Watcher 12″ Dobsonian Flextube. But on the way home, I came up with something a little more complicated and time-consuming. A custom-made cloth shroud.

Step 1: I measured the inside diameter of the top and bottom tubes and the distance between them. I came up with 42.5″ diameter x 23″ height. I went to the local Fabricland and bought a thick black cloth from the clearance section ($7).

Step 2: I measured again and noticed that I had to reduce the inside diameter by half an inch to account for the thickness of the cloth. The maximum thickness allowance is 0.5″, otherwise, the material will reduce the aperture. I folded and ironed the new measurements. My wife sewed the edges for me.

Step 3: I taped 2 and a half lengths of velcro ($3 from Dollarama) to the top and bottom edges of the cloth and ironed them on. But by that time, my wife had gone to bed. So I had to sew the width side by hand to form the tube (the sewing machine was too complex for me).
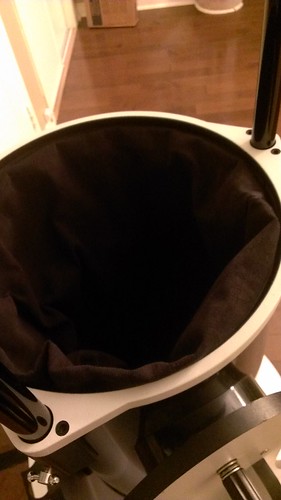
Step 4: I then taped the hook side of the velcro to the inside of the top and bottom tubes and attached the shroud starting from the bottom.
Step 5: With a little tug, I attached the top making sure it was taught all the way around. I looked through the focuser to ensure the shroud was not in the way of the primary.
Voila! A custom-made shroud just the way I like it. Tomorrow, I will be sewing the velcro onto the shroud because it is peeling off.
Hope you enjoyed this DIY.

How to Centre the Secondary Mirror by Using a Camera Phone
Today, I learned a lesson in troubleshooting a collimation problem with my new dobsonian telescope. When I took the secondary mirror off to install a washer, I could not properly get it collimated with my laser collimator on reassembly. One problem with laser collimators is that it assumes that the secondary mirror is already centred under the focuser. But that is easier said than done. Until now.
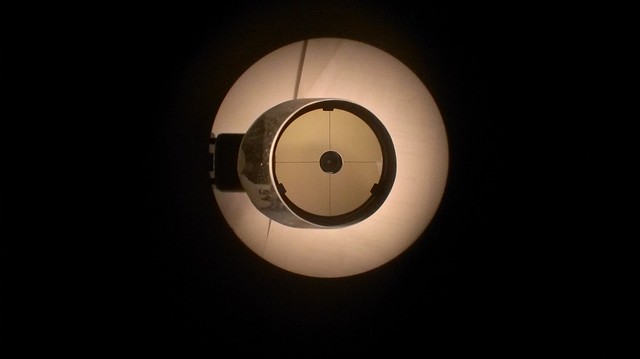
Symptom: When I looked through the collimating cap after a laser collimation, it looked like the above photo. The primary mirror’s clips were off-centre. It was actually worse than what the photo shows. However, the photo provides a clue of what the problem may be: the secondary is not centred.
So below were the steps I took to collimate after disassembling the secondary:
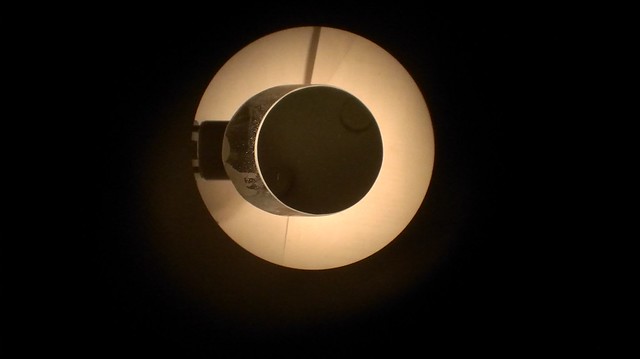
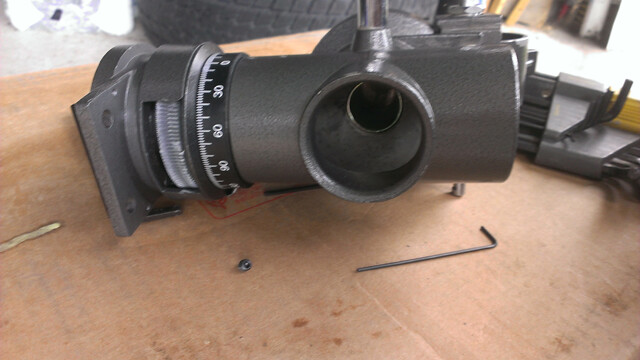
Step 1: Above, I rough aligned the secondary under the focuser and took a photo. To the untrained eye (like mine), my secondary mirror looked centred through the 1 mm hole of my collimating cap.
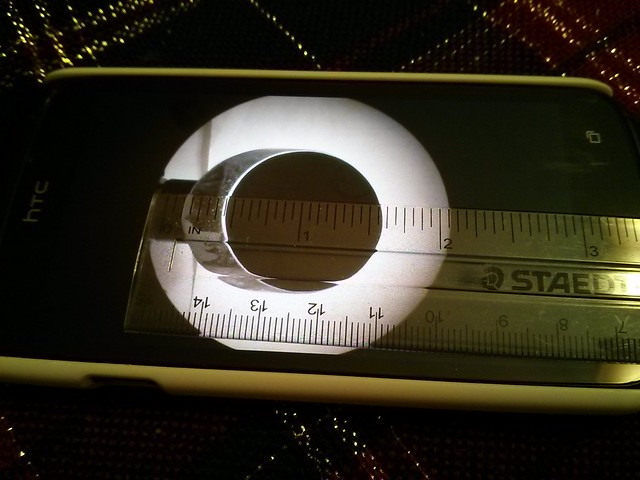
Step 2: That was until I took a ruler and measured it on my screen as shown above. So I kept adjusting the secondary until both sides were equal. I pinched to zoom for more accuracy.
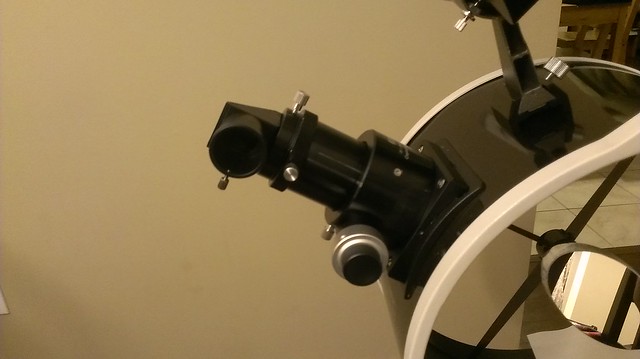
Step 3: I used a right-angle diagonal focuser above from my refractor so that I can adjust the primary adjustment screws and receive instant feedback without walking back and fourth. I centred the donut to the reflection of the secondary.
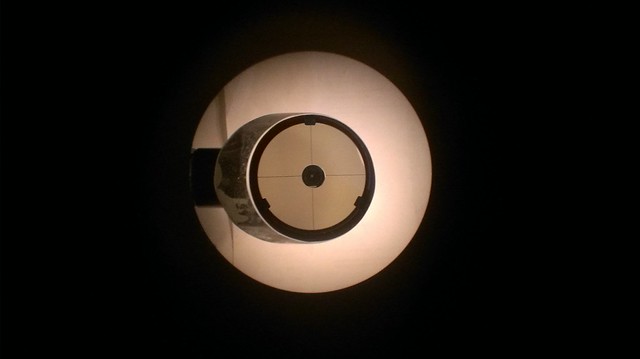
Step 4: I replaced the collimating cap to verify alignment and it looked good as shown above. I then followed it up with a laser collimation and it still looked good afterwards.
Out in the field, I will be star testing it for fine tuning. My laser collimator was 99% true so if you plan on doing the same procedure above, check to make sure your laser collimator is properly collimated in the first place. Credits go out to the following AstronomyForum.net members for helping me troubleshoot the problem: mlk1950, CamelHat, andrejl2, Jason_D

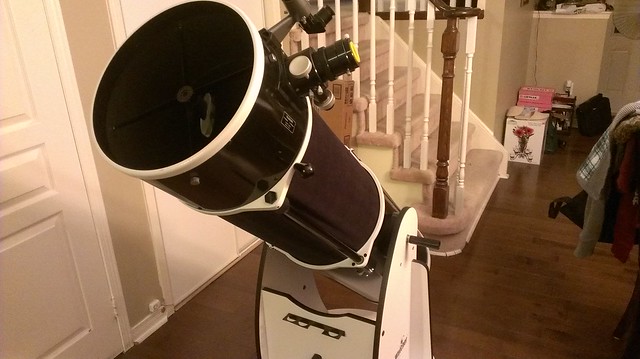
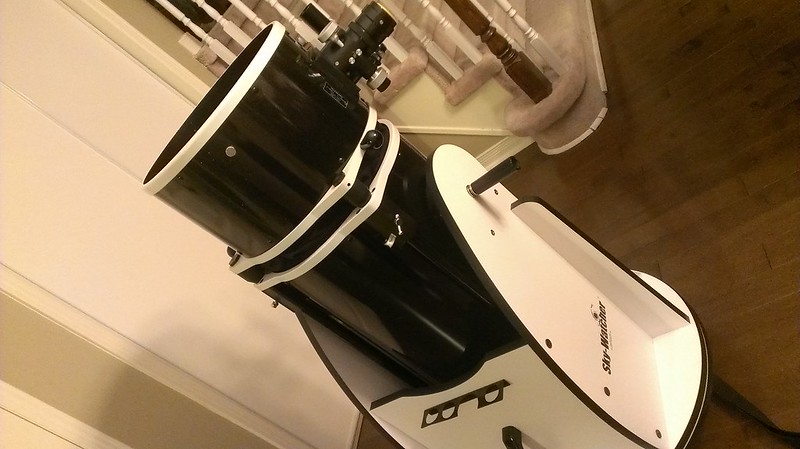
Bought a used 12″ Sky-Watcher Dobsonian Flextube Truss
Well into my first month of my astronomy hobby, and I’m already on my 4th telescope gear: a 12″ Sky-Watcher Dobsonian with collapsible trusses. Standing next to my 8″ newt, it looks like a monster scope.
The Good
I believe I got a pretty good deal with this one because it has several upgrades including:
– dual speed focuser
– stiffer primary mirror springs
– smoother azimuth bearings
– swivel caster wheels under the base
and considering these were missing:
– eyepieces
– finder scope
The condition is almost brand new, no scratches on the base, and clean and shiny exterior. The primary and the secondary mirrors have some dust on them: an indication that they have never been touched. Then again, the average astronomer take extra special care of their telescopes. The total cost was “significantly” lower than a brand new one. But it cost me extra gas because had to drive 2 hours one way to pick it up.
First Challenges
Having spoiled by my Discovery 8 EQ in convenience/performance, I have to manage my expectations in order to overcome these challenges:
Heavy: Moving the telescope from my living room to the front door was easy because it had casters. Only when I had to disassemble and reassemble it outside that I realized how heavy and unwieldy this telescope was. I was expecting this before I bought it, but not as much as this.
Decollimated: I had collimated the scope inside, but when I reassembled it outside, it had miscollimated by a quarter of an inch.
Underfocussed: The upgraded dual-speed focuser was too short and extension tube was not included. I reached focus by pulling out the eyepiece by 30mm.
Jerky Tracking: Azimuth motion was very smooth, but altitude was quite jerky and squeeky making tracking and sketching more challenging than my GEM-mounted scope that had a smooth slow motion RA.

First Impressions
First light was just outside my front door where I was subject to intense glare from my neighbours’ lights and street lights. The only way for me to judge the performance would be to take it to the same dark site where I have been taking my 8-incher. I might get a chance to do that this weekend.
In about a month, I will decide which one of my telescopes will have to go.
Lin-Optics Equatorial Mount Maintenance Project
My Discovery 8 EQ‘s equatorial mount is over 10 years old and it has been very ‘sticky’. It is a ‘Lin-Optics’ brand-name mount that I cannot find of any documentation on the web. Last week, I attempted to disassemble it to replace the lubrication but could not figure out how to remove the inner shafts.
This weekend, I finally had more time to look into the issue further. I needed a little bit more time to carefully figure out which set screws were meant to be removed, and which were meant to be tightened down in order to remove the shafts. It was like a rubik’s cube puzzle.
After an hour, I finally figured it out. The ascension shaft took me half as much time to figure out. I cleaned the parts with degreaser spray and wiped them clean with paper towels. If I could have collected the metal filings, I would say there was about a teaspoon of it. I then applied a generous amount of white lithium grease and put it back together.
Now, my mount is buttery smooth with the Newtonian telescope on it. It feels like I just bought myself a new mount. A fun project with long-lasting benefits.
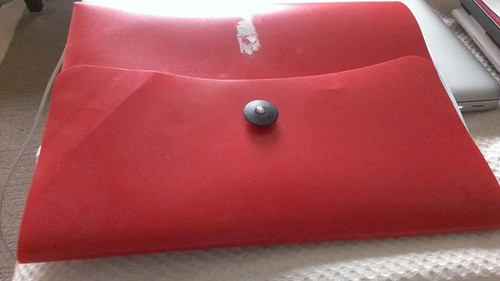
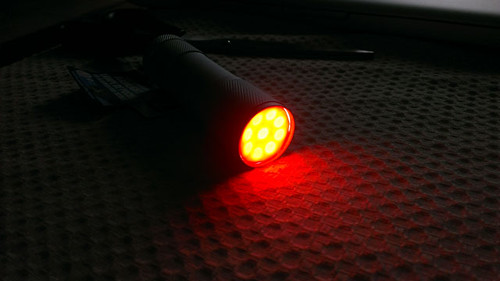
DIY Astronomical Red LED Flashlight

It’s not like this hasn’t been done before, but I needed a red flashlight in a hurry so I put one together using a flashlight from the Dollar Store and red plastic folder kicking around. It takes at least 20 minutes for our eyes to dark adapt, and only a few seconds to lose it by shining a bright light into the pupil. Red light has the least effect on our dark adaptation so that we can observe faint objects and sketch them.
Materials:
1. Flashlight. I bought one from the Dollar Store.
2. Red semi translucent acrylic folder or tote.
3. Scissors.
4. Pencil.
Instructions:
1. Use the head of the flashlight to trace a circle on the acrylic folder. The circle will be larger than the interior of the tube so make sure you trace the line as close as possible.

2. Cut out the circle making sure it is slightly bigger than the flashlight opening. The slight difference will make it push against the interior of the flashlight as well as provide maximum coverage of the white LED’s.
3. Insert plastic cutout into flashlight head. Because the cutout is slightly bigger, the edges will push against the opening to keep itself in place. If the piece is too big, cut away small pieces of it until it is just snug.

4. Turn on flashlight to test for light leaks. Redo if necessary.
If the light appears too dim, try it out in a dark room first, like a closet or bathroom. It might just be the perfect brightness. You don’t want it too bright.
Try this out. If you have ways to improve this Do It Yourself project, please share your comments below.