All posts by Michael

I am an amateur astronomer from Oshawa, Ontario, Canada. I have always been fascinated by astronomy ever since I was a child. In August 2013, I purchased my first telescope and haven’t looked back since. I am a member of the Durham Region Astronomical Association as well as a member of various online forums.

How to Centre the Secondary Mirror by Using a Camera Phone

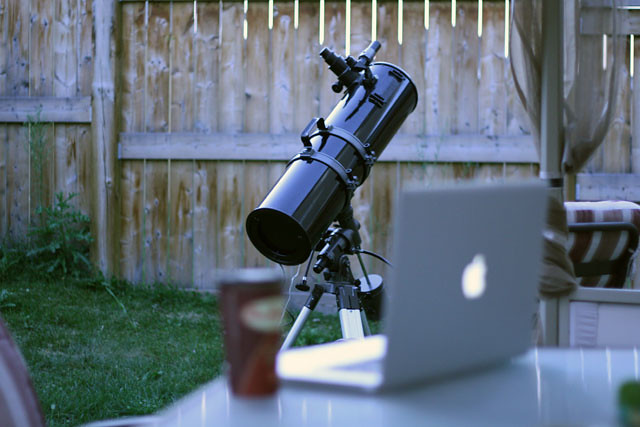
Today, I learned a lesson in troubleshooting a collimation problem with my new dobsonian telescope. When I took the secondary mirror off to install a washer, I could not properly get it collimated with my laser collimator on reassembly. One problem with laser collimators is that it assumes that the secondary mirror is already centred under the focuser. But that is easier said than done. Until now.

Reflection of the primary mirror’s clips are off centre.

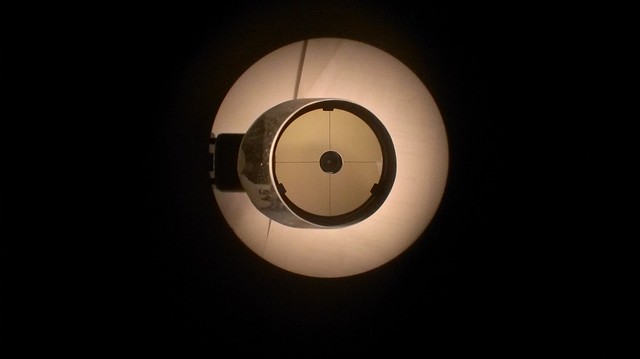
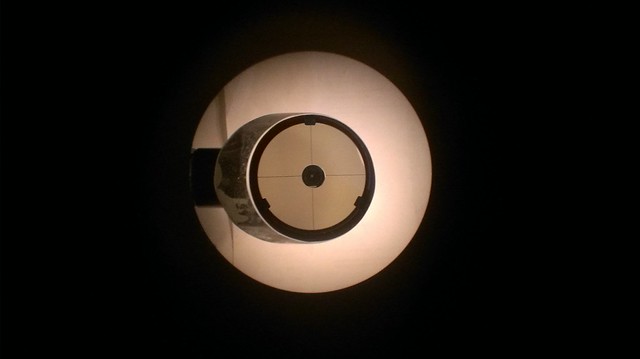
Symptom: When I looked through the collimating cap after a laser collimation, it looked like the above photo. The primary mirror’s clips were off-centre. It was actually worse than what the photo shows. However, the photo provides a clue of what the problem may be: the secondary is not centred.

So below were the steps I took to collimate after disassembling the secondary:

Reflection of the primary tube with the cover on.

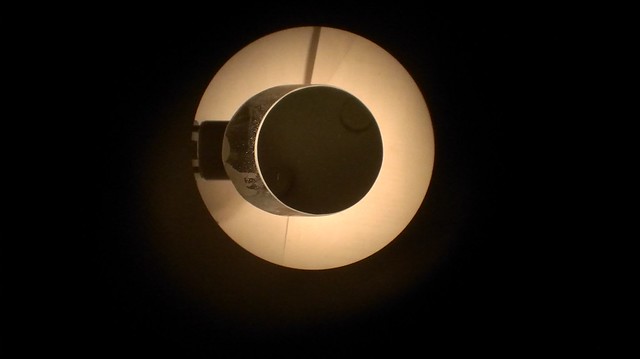
Step 1: Above, I rough aligned the secondary under the focuser and took a photo. To the untrained eye (like mine), my secondary mirror looked centred through the 1 mm hole of my collimating cap.

Using a ruler to measure the secondary mirror’s distance from the focuser tube.

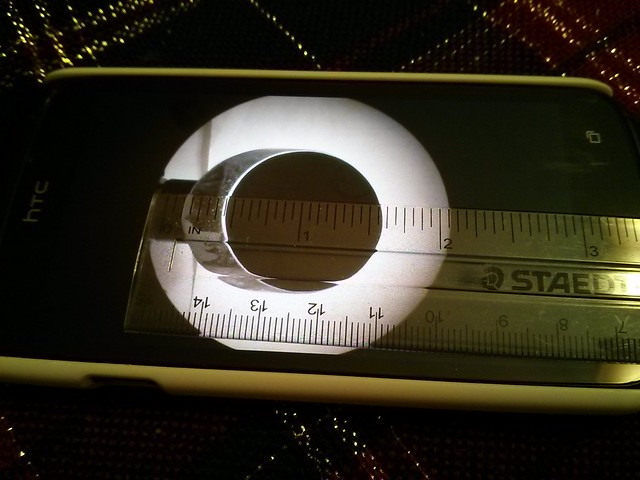
Step 2: That was until I took a ruler and measured it on my screen as shown above. So I kept adjusting the secondary until both sides were equal. I pinched to zoom for more accuracy.

My refractor’s diagonal being used as a collimator.

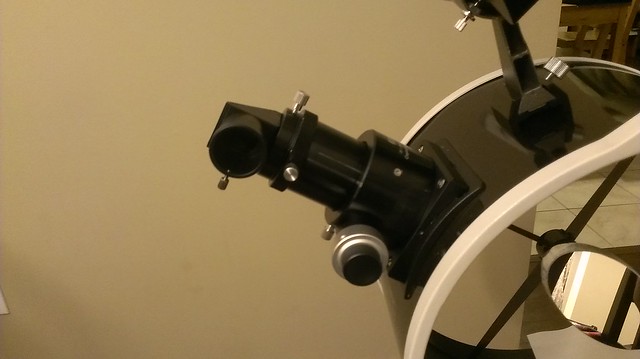
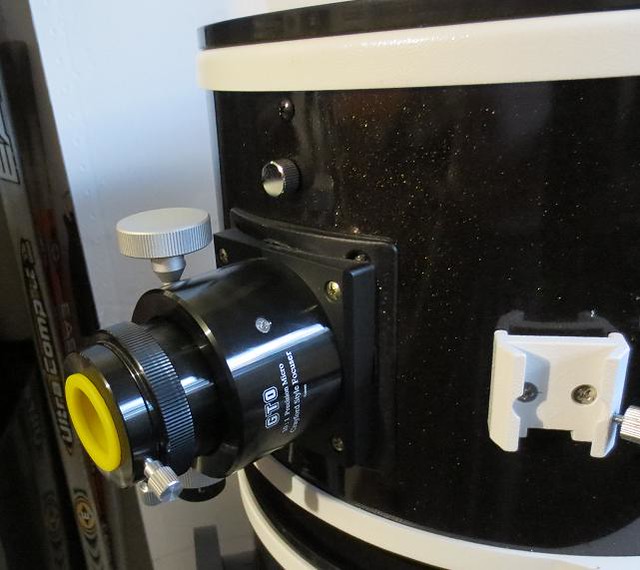
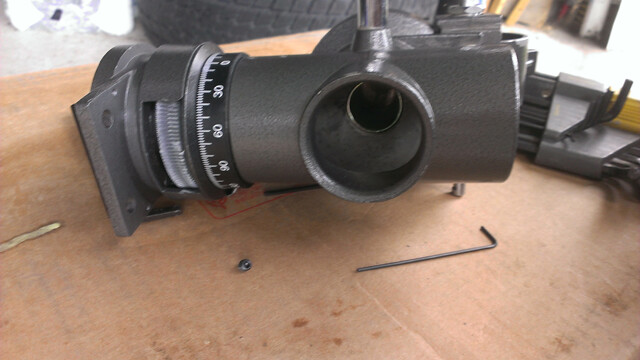
Step 3: I used a right-angle diagonal focuser above from my refractor so that I can adjust the primary adjustment screws and receive instant feedback without walking back and fourth. I centred the donut to the reflection of the secondary.

The reflection of the primary mirror clips appearing centred.

Step 4: I replaced the collimating cap to verify alignment and it looked good as shown above. I then followed it up with a laser collimation and it still looked good afterwards.

Out in the field, I will be star testing it for fine tuning. My laser collimator was 99% true so if you plan on doing the same procedure above, check to make sure your laser collimator is properly collimated in the first place. Credits go out to the following AstronomyForum.net members for helping me troubleshoot the problem: mlk1950, CamelHat, andrejl2, Jason_D

Gravenhurst Muskoka Family Star Party

Gravenhurst Muskoka Family Star Party 2013

Get ready for a family star party in the Muskoka Region of Ontario. Between Friday, October 4th and Saturday October 5, 2013, there will be a star party at the Torrance Barrens Dark Sky Site.

Organized by local astronomy clubs, it will feature a talk and slide show by prolific Canadian amateur astronomer Terence Dickinson, author of the popular book “Nightwatch: A Practical Guide to Viewing the Universe” and “The Backyard Astronomer’s Guide”.

It will be held at the Gravenhurst KOA and Torrance Barrens Dark Sky Site.

Gravenhurst Muskoka FAMILY STAR PARTY

When: Friday, Oct. 4, and Saturday, Oct. 5, 2013

Where: Gravenhurst KOA, 1083 Reay Road and TorraRnce Barrens Dark Sky Site

Featuring ASTRO TALK BY TERENCE DICKINSON followed by telescope viewing at KOA and Torrance Barrens

• 25% discount at KOA, some cabins available 1-800-562-9883, e-mail gravenhurstkoa@cogeco.net contact direct for discount

• Hotels: Mariott 705-687-6600 and Howard Johnson 705-687-7707

• Local merchant coupons for attendees • Beautiful Muskoka seasonal events

For more information, contact Alan Keates at 705-687-4364 or e-mail gerryflaherty@rogers.com

Bought a used 12″ Sky-Watcher Dobsonian Flextube Truss

12″ Sky-Watcher Flextube dobsonian with upgraded GSO dual-speed focuser

Well into my first month of my astronomy hobby, and I’m already on my 4th telescope gear: a 12″ Sky-Watcher Dobsonian with collapsible trusses. Standing next to my 8″ newt, it looks like a monster scope.

The Good
I believe I got a pretty good deal with this one because it has several upgrades including:

– dual speed focuser
– stiffer primary mirror springs
– smoother azimuth bearings
– swivel caster wheels under the base

and considering these were missing:

– eyepieces
– finder scope

The condition is almost brand new, no scratches on the base, and clean and shiny exterior. The primary and the secondary mirrors have some dust on them: an indication that they have never been touched. Then again, the average astronomer take extra special care of their telescopes. The total cost was “significantly” lower than a brand new one. But it cost me extra gas because had to drive 2 hours one way to pick it up.

First Challenges
Having spoiled by my Discovery 8 EQ in convenience/performance, I have to manage my expectations in order to overcome these challenges:

Heavy: Moving the telescope from my living room to the front door was easy because it had casters. Only when I had to disassemble and reassemble it outside that I realized how heavy and unwieldy this telescope was. I was expecting this before I bought it, but not as much as this.

Decollimated: I had collimated the scope inside, but when I reassembled it outside, it had miscollimated by a quarter of an inch.

Underfocussed: The upgraded dual-speed focuser was too short and extension tube was not included. I reached focus by pulling out the eyepiece by 30mm.

Jerky Tracking: Azimuth motion was very smooth, but altitude was quite jerky and squeeky making tracking and sketching more challenging than my GEM-mounted scope that had a smooth slow motion RA.

Foreground: New new (used) 12″ Sky-Watcher Flextube dobsonian. Background: My Discovery 8 EQ on hockey pucks.

First Impressions
First light was just outside my front door where I was subject to intense glare from my neighbours’ lights and street lights. The only way for me to judge the performance would be to take it to the same dark site where I have been taking my 8-incher. I might get a chance to do that this weekend.

In about a month, I will decide which one of my telescopes will have to go.

Lin-Optics Equatorial Mount Maintenance Project

Lin equatorial mount disassembled for lubrication replacement.

My Discovery 8 EQ‘s equatorial mount is over 10 years old and it has been very ‘sticky’. It is a ‘Lin-Optics’ brand-name mount that I cannot find of any documentation on the web. Last week, I attempted to disassemble it to replace the lubrication but could not figure out how to remove the inner shafts.

This weekend, I finally had more time to look into the issue further. I needed a little bit more time to carefully figure out which set screws were meant to be removed, and which were meant to be tightened down in order to remove the shafts. It was like a rubik’s cube puzzle.

After an hour, I finally figured it out. The ascension shaft took me half as much time to figure out. I cleaned the parts with degreaser spray and wiped them clean with paper towels. If I could have collected the metal filings, I would say there was about a teaspoon of it. I then applied a generous amount of white lithium grease and put it back together.

Now, my mount is buttery smooth with the Newtonian telescope on it. It feels like I just bought myself a new mount. A fun project with long-lasting benefits.

Double Cluster in Perseus and NGC 663

My sketch of the Double Cluster in Perseus

Tonight was humid but the last cloudless night before several days of cloudiness. So I headed back to Long Sault Conservation Area for a dark sky. I brought the Nightwatch book to reference the objects I wanted to observe tonight in Perseus and Cassiopeia.

It was already pitch black when I got there and was glad to see another stargazer lying down on the grass with his binoculars. His company set me at ease and allowed me to hunt and sketch NGC 663 in a more relaxed manner. Not realizing one of the collimation screws was already backed out all the way, it came lose. It took me 10 minutes to put it back.

My sketch of NGC 663

I was half way through sketching the double cluster when he approached me for some small talk and to say goodbye. After he left, I was once again alone and uneasy so I rushed through the double cluster leaving out a lot of the details. I had been observing for 2 hours and didn’t realize that my OTA and primary was literally dripping in condensation so I packed up.

Once again, it was a very productive night for me. I am no longer questioning my telescope’s optics. It was just a matter of finding a dark sky.

I finally found M13 and the Milky Way

A sketch of Messier 13 (M13)

Tonight, I set out to go to a dark site alone at the Long Sault Conservation Area in Clarington, Ontario. I was there scouting the area last night. I brought my gear with me, but it was too cloudy last night. Tonight, was humid with patches of fog, and below average seeing, but the center of the sky was clear enough.

I left 30 minutes after sunset and the site was 20 minutes away, so by the time I was setting up my equipment, it was almost pitch black.

Milky Way Galaxy: I looked up at the sky and found that there was haze near the horizon. And then, what I thought was a strip of haze across the middle of the sky… was actually the Milky Way. Wow! This was the first time I have laid eyes on it! It was spectacular! There were so many stars, I was disoriented at first and didn’t know where the constellations were.

This was my chance to see if I needed to upgrade my telescope! So I aimed my Telrad at the spot where I knew M13 was supposed to be, looked into my eyepiece and… BAM! There it was! I couldn’t believe it! It was a dark circular patch of dim stars!

M13: Out goes my sketching kit and I started sketching away. As the sketching session wore on, my observation skills improved. I started using averted vision and I noticed more fainter stars that ended up in my sketch. I have attached my first sketch of M13.

M31: After that, I aimed at M31 and BAM! There it was: the Andromeda Galaxy and off to the left is what looks like a smaller faint object. But my goal tonight was to sketch M13 only so I just observed it.

So in the end, I really did “upgrade” my telescope just by driving 20 minutes away. This is my most successful outing so far and it wasn’t even a good seeing night. I am really enjoying hunting and sketching. Clear skies!

DIY Astronomical Red LED Flashlight

Before and after photo of my Do It Yourself project on how to turn a white LED flashlight into a red astronomical flashlight to minimize reversal of our dark adaptation.

It’s not like this hasn’t been done before, but I needed a red flashlight in a hurry so I put one together using a flashlight from the Dollar Store and red plastic folder kicking around. It takes at least 20 minutes for our eyes to dark adapt, and only a few seconds to lose it by shining a bright light into the pupil. Red light has the least effect on our dark adaptation so that we can observe faint objects and sketch them.

Materials:

1. Flashlight. I bought one from the Dollar Store.
2. Red semi translucent acrylic folder or tote.
3. Scissors.
4. Pencil.

Instructions:

1. Use the head of the flashlight to trace a circle on the acrylic folder. The circle will be larger than the interior of the tube so make sure you trace the line as close as possible.

A small keychain LED flashlight from the Dollar store. This one is about 5″ long.

2. Cut out the circle making sure it is slightly bigger than the flashlight opening. The slight difference will make it push against the interior of the flashlight as well as provide maximum coverage of the white LED’s.

A red translucent folder or tote.

3. Insert plastic cutout into flashlight head. Because the cutout is slightly bigger, the edges will push against the opening to keep itself in place. If the piece is too big, cut away small pieces of it until it is just snug.

A round cutout of the red translucent folder.

4. Turn on flashlight to test for light leaks.  Redo if necessary.

Red flashlight ready for astronomical site.

If the light appears too dim, try it out in a dark room first, like a closet or bathroom. It might just be the perfect brightness. You don’t want it too bright.

Try this out. If you have ways to improve this Do It Yourself project, please share your comments below.

My First Astronomy Sketch: Jupiter and its moons

My first astronomy sketch: Jupiter and its moons

Last night, I only had a window of less than 2 hours to look for M13 but I still did not find it. Haze had started to form near the horizon and my next door neighbour decided to keep their porch lights on tonight creating a glow in my view. I gave up after 2 hours and set up my alarm to wake me up at 4:30 AM so that I can check out Jupiter and Mars.

Fast forward to 4:30 AM:

My first view of the gas giant through light haze made my jaw drop. Here I am looking at what Galileo first saw 400 years ago. I took the opportunity to line-up my telrad as well. At first, it was just a white disk waving like a flag with 2 moons to the right. After fine-tuning my focuser I noticed 2 faint lines above the equator. After 5 minutes, I noticed a fainter third line near the top pole, and another moon appeared closer to the planet but in a more southern orbital plane. There also appears to be a 4th moon but it seems too far to the left that it might be a star.

I tried to take a picture of it using my phone to no avail. So I quickly looked for a piece of paper and a pen and made a rough sketch of it (attached). This was a lot of fun and self-gratifying!

While I was there, I also looked at Mars, but it was just an unremarkable faint brown dot. The Orion nebula was just to the right so I scanned it but the moon was just too bright and the haze was too much.

Overall, this morning’s experience was an unforgettable one, and I have a sketch I will remember it by.

I Bagged My First DSO with a Pair of Binoculars

My Nikon 8×40 Action VII

Last night, I setup my Newt to look for M13, the Hercules globular cluster. My 4th attempt.

Earlier in the day, I had been in contact with another astronomer an hour away to the north. At night fall, he texted me and told me that he’s got M13 in his CPC 800 through 18mm and it was brilliant taking up a third of the frame. That prompted me to quickly setup my gear in the yard: collimated scope, eyepieces, Stellarium, eye patch, towel & coffee… check! Darkness was good (before the moon rose anyway), excellent transparency, good seeing, no wind, normal humidity, and mild temperatures.

After an hour, I still could not find M13. I know where it should be and what it looks like. I tried it with my binoculars and I still can’t find it. I brought out my 90mm refractor and I still cannot find it. I has been 2 hours and the moonlight has started to make the sky glow. So I packed up.

The last thing I brought back inside were my binoculars (Nikon 8×40 Action VII). But before I walked in, I thought of checking out Andromeda with my binos. I slewed towards Cassiopaea then scanned downwards diagonally to where it points. Then, there it was. I noticed a blurry dark grey patch at the corner of my eye. I slewed towards it, past it, back and forth. It was undeniable: that was the Andromeda Galaxy. My first DSO. The feeling was a mix of excitement and awkward fear. Excited because I finally bagged my first DSO ever. Awkward fear was because it was like unveiling a ghost that had been staring at me since birth and all I saw was a tiny portion of it.

My bino’s beat out my telescopes even on a sky with moonlight. I suspect the problem is with my eyepieces. Today, I will be receiving my first real eyepieces (Celestron X-Cel LX). The forecast tonight looks good and will give it another go at M13.

My Second Night Out with my Discovery 8 EQ

My Discovery 8 EQ

I’m a newbie amateur astronomer from Oshawa, ON (Canada). Tonight, I setup my Discovery 8″ EQ reflector in the middle of an open field in my neighbourhood 200 feet away from the nearest street light. I also used this chance to align my finder. With my limited knowledge of the skies, I was able to observe:

Venus: It was so close to the rooftops by the time I was ready to view it. It was so small and so bright that it was hard to see the disk. It seemed like it was better through my refractor.

Saturn: It was bigger than Venus and sharper in medium magnification. It seemed the same through my refractor. At higher magnification, it got blurry that I thought there was dust in my eyepiece so I took it out and blew at both sides of the lens. Bad newbie move. It fogged up.

Moon: This was the first time I looked at the moon through a telescope ever, and my first reaction was saying “holy f***” in the middle of the field. As I continued to increase the magnification using different eyepieces, I was amazed at the detail. I saw a crater in the middle of a crater! I began to wonder how big these craters were and how could meteors hit the near side of the moon yet missing Earth! I began to wonder how the dark side might be even worse! Then within 3 minutes, my eye began to hurt, so I put on the tube cover and removed the 2 small hole covers to reduce the intensity, but it didn’t help much.

Then I scanned the summer triangle, looking for the one that is supposed to be a double star. I couldn’t find it.

In total, it was 20 mins for setup and tear down, and an hour of observing. I’m loving this new hobby. Now if I can find someone else in my neighbourhood with experience to join me in darker skies, that would be even better so that I don’t look like a creep in the middle of our field. Signing out!