

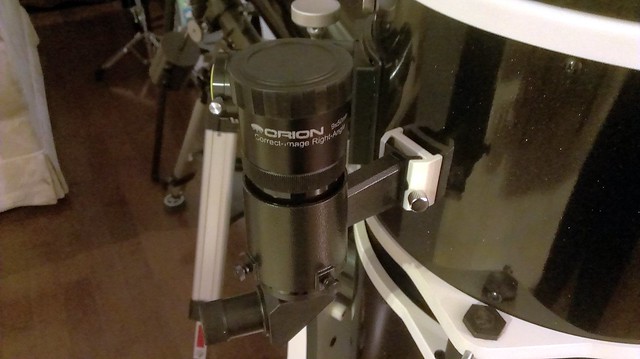
Many telescopes come with a straight-through finder scope or a right-angle finder scope. My Discovery 8 EQ came with the later which was very difficult to use because it was unintuitive. My 12″ Sky-Watcher has a Right Angle Corrected Image (RACI for short) finder scope. The advantage of using a RACI over a straight through finder scope or a regular right angle finder scope are:
- The 90 degree eyepiece allows you to use the finder scope more comfortably;
- The Amici prism corrects the image caused by the 90 degree redirection so that the image is right side up.
This eliminates 2 problems: 1) straight through finders can become uncomfortable to use especially when objects are near zenith, and; 2) objects in the finder scope move in unintuitive directions.
However, for newcomers to Astronomy like myself, locating objects through the RACI finder scope still proved to be challenging because of one thing: the view is awash with stars I have never seen before, especially in light polluted skies. I found myself in this situation not too long ago, and in many cases, I still do. The solution was simple, but difficult to master. At least in the beginning.
Rough Aligning
To rough align the finder, I stand behind the telescope until my head is aligned with it so that the optical tube appears vertical. Then I point it to one of the major stars of the constellation in question. This took some practice, but after a few sessions, I can now rough align without standing behind the telescope.
Using Binoculars
My finder scope has a 9x zoom magnification. I also happened to have a pair of binoculars which has an 8x zoom magnification. If I were to locate M13 in the constellation of Hercules, with the naked eye, I can only see 4 major stars. Through the binoculars, I can see more major stars and dozens of minor stars.
The view through my binoculars will be very similar to my finder scope. At first, it’s hard to tell which portion of the constellation I am looking at. So I spend a few minutes studying the constellation comparing views in the binoculars, finder scope, and a sky atlas.
I look for patterns and shapes that I can use to star hop. For examples, I try to imagine shapes, like triangles, squares, or curved lines on the atlas, and then I try to look for those in the field of view.
I keep doing this for every new constellation I am studying. I try to learn the names of the major stars if I want. After a while, my brain and my eyes develop a stronger connection with my orientation in the constellation in question.
In the case of M13, it took me a week to find it the first time. But after about 3 successful attempts, I can easily resolve it through the finder scope as a faint star within a few seconds. This is because my brain and eyes know where to look and what to expect to see.
Using a Keyring
After a few times practicing, you will have an idea of the size of your finder scope as it is superimposed in the sky. But in the beginning, you probably won’t. A good technique is to use a keyring, a rubber band, or something round that you can change its shape.
Look through your finder scope and identify the major stars you see. Then place a keyring on your sky atlas to estimate your field of view. Move the finder scope one degree, or until you see the next major star. Then on your atlas, move the keyring in the same direction.
Keep using these techniques until you become familiar with the constellations. Eventually, you will become so used to it, you won’t need the keyring, or maybe even a star atlas on your favourite constellations.
Do you have any tips for using a RACI? Let us know in the comments section below.